Unlock Gourmet Flavor: Easy Cake Balls Recipe with a Secret Twist
There's an undeniable magic in homemade treats, and few delights capture that charm quite like perfectly crafted cake balls. These bite-sized wonders are not only incredibly versatile and fun to customize but, with the right approach, can taste like they came straight from a gourmet bakery. If you've been seeking an easy cake balls recipe that delivers consistent deliciousness and a truly unique flavor experience, you've found your new kitchen go-to. I’m here to guide you through creating moist, rich, and utterly irresistible cake balls, complete with expert secrets that will elevate your baking prowess from simple to sophisticated. Get ready to impress everyone with these delightful dessert bites.
Why settle for ordinary when extraordinary is so easily within reach? This isn't just another `cake balls recipe`; it’s a blueprint for culinary success, promising a profound depth of flavor and a texture that melts in your mouth. The beauty lies in its simplicity – transforming a humble box mix into something that tastes utterly homemade and incredibly special. Beyond the gourmet twist, this recipe is wonderfully quick and easy, making it perfect for busy home bakers, a delightful project with kids, or a stunning addition to any party spread.
The Secret to Unforgettable Cake Balls: Our Gourmet Twist
In my culinary journey, I've discovered that the smallest, most thoughtful adjustments often yield the biggest flavors. My secret for this easy `cake balls recipe` lies in two subtle yet powerful additions that transform a simple treat into a gourmet experience. These aren't complicated techniques; they're clever flavor hacks that deepen and harmonize the overall taste, making each bite more complex and satisfying.
Elevating Flavor with Aromatic Extracts
The first secret weapon is a complementary extract, added directly into your cake-frosting mixture. This isn't merely about layering flavors; it's about building an aromatic depth that makes your cake balls taste genuinely "from scratch" with a nuanced profile. While the reference suggests 1/2 teaspoon, I often find adjusting slightly to taste can be beneficial, depending on the extract's potency.
* **Almond Extract:** A fantastic choice for vanilla, yellow, or even chocolate cakes, offering a sophisticated, nutty aroma.
* **Peppermint Extract:** Perfect for a festive touch, especially with chocolate or red velvet cake, creating a refreshing contrast.
* **Orange Extract (or Lemon/Lime):** Adds a bright, zesty note that cuts through richness beautifully, especially with lemon, vanilla, or berry-flavored cakes.
* **Vanilla Bean Paste:** For an extra luxurious vanilla flavor, a tiny bit of paste instead of liquid extract can make a huge difference.
This small addition creates a noticeable difference, infusing the cake base with an extra layer of perfume and taste that elevates it far beyond what you'd expect from a standard box mix.
Achieving Balanced Sweetness (Beyond the Box)
The second crucial element, often overlooked, is achieving a truly balanced sweetness. While box mixes and canned frostings are convenient, they can sometimes err on the side of overwhelmingly sweet. My approach involves a conscious effort to mellow this without sacrificing flavor.
* **Thoughtful Frosting Selection:** Pair your cake mix with a frosting that complements it, but also consider its sweetness level. For instance, using 1 cup + 2 tablespoons of cream cheese frosting with a Red Velvet or Spice cake can offer a delightful tang that balances the sweetness more effectively than a standard buttercream.
* **A Pinch of Salt:** This might sound counterintuitive for a dessert, but a tiny pinch of fine sea salt (about 1/8 to 1/4 teaspoon, depending on your batch size) added to the cake-frosting mixture can dramatically enhance other flavors and cut through perceived sweetness without making the cake balls savory. It's a chef's trick that makes sweet things taste "sweeter" in a good way, by making flavors pop.
* **Adjusting Frosting Quantity:** While 1 cup + 2 tablespoons is a good starting point, if your particular cake mix is extremely moist, or your frosting is exceptionally rich, you might start with just 1 cup and add more incrementally until you reach the perfect, pliable consistency. Over-frosted balls can be too sweet and too soft.
These nuanced adjustments transform a standard box mix into a confection that tastes homemade from scratch, boasting a truly complex and nuanced flavor profile. The result? Consistently moist, rich, and beautifully smooth cake balls that are incredibly customizable for any occasion or preference. For more insights on achieving the perfect texture, you might find this article helpful:
Perfectly Moist Cake Balls: The Simple Recipe for Elevated Taste.
Gathering Your Ingredients: Simple Staples for Gourmet Results
The beauty of this `cake balls recipe` lies in its accessible ingredients, proving that you don't need exotic items to create something truly special.
For the Cake Base:
* **1 box cake mix:** Your flavor of choice. Brands known for their moisture and fine crumb (like Duncan Hines or Betty Crocker) truly shine here. Experiment with flavors like Yellow, Chocolate, Strawberry, Red Velvet, Funfetti, Spice, or Lemon. While this recipe prioritizes convenience, you can absolutely use homemade cake and frosting if you prefer!
* **Eggs, oil, and water:** As called for on your specific cake mix box.
* **1 cup + 2 tablespoons canned frosting:** Again, your flavor of choice. Canned frosting is key to binding the cake crumbs and adding that essential moisture. Cream cheese frosting with Red Velvet or Spice cake is a decadent pairing.
For Coating & Decoration:
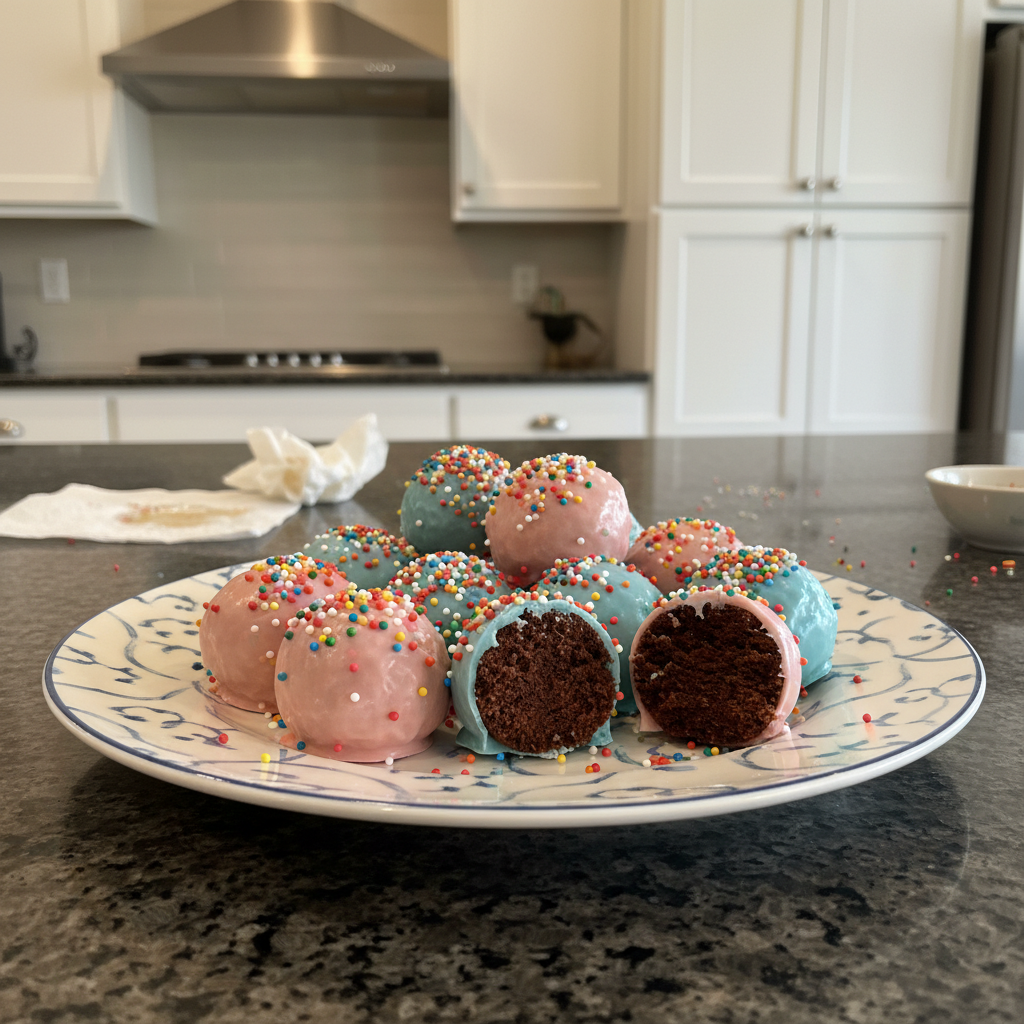
* **1 pound candy melts:** I consistently recommend Ghirardelli Melting Wafers for their superior melt, smooth consistency, and fantastic taste. Their quality makes dipping a breeze and ensures a professional-looking finish.
* **1/2 cup sprinkles:** Or any other desired decorations like edible glitter, chopped nuts, or drizzle.
Step-by-Step Guide: Crafting Your Perfect Cake Balls
Making these gourmet cake balls is a fun and straightforward process. Follow these steps for flawless results every time.
-
Prepare Your Cake: Bake the cake mix according to the package directions. It’s crucial to let the cake cool completely before moving to the next step. A warm cake will create a greasy, messy mixture.
-
Crumble and Mix: Once cooled, crumble the cake thoroughly into a large mixing bowl. Use your hands to get a fine, even crumb. Add the 1 cup + 2 tablespoons of canned frosting (start with 1 cup and add more if needed for consistency) and your secret twist ingredient – the 1/2 teaspoon of complementary extract, along with a tiny pinch of salt if using. Mix well until everything is thoroughly combined and the mixture forms a moist, cohesive "dough." It should be firm enough to roll into balls but pliable.
-
Form the Balls: Roll the mixture into approximately 1-inch to 1.5-inch balls. Aim for uniform size for even dipping and a professional appearance. Place the formed balls on a baking sheet lined with parchment paper or a silicone mat.
-
Chill for Success: Refrigerate the cake balls for at least 30 minutes, or up to an hour. This chilling step is vital as it helps the balls firm up, preventing them from crumbling or losing their shape during dipping.
-
Melt and Dip: Melt your candy melts according to package directions. I recommend using a microwave-safe bowl in 30-second intervals, stirring in between, until smooth. If using other candy melt brands and they seem too thick, add 1-2 teaspoons of shortening to the melted coating; it helps achieve a smoother, more dip-friendly consistency.
-
Coat and Decorate: Using a fork or a dipping tool, gently submerge each chilled cake ball into the melted candy. Tap off any excess coating, allowing it to drip back into the bowl. Immediately transfer the coated ball back to the parchment-lined baking sheet. While the coating is still wet, sprinkle with your chosen decorations. Repeat with the remaining cake balls.
-
Set and Serve: Allow the coated cake balls to set completely at room temperature or in the refrigerator. Once firm, they're ready to be enjoyed!
Expert Tips for Cake Ball Perfection & Customization
Making delicious cake balls is easy, but a few expert tips can elevate your results from good to absolutely perfect.
-
Temperature Control is Key: Ensure your cake balls are well-chilled, but not frozen solid, before dipping. The contrast in temperature helps the coating set quickly and smoothly. Also, keep your melted candy melts at the right temperature – too hot and it will be too thin and melt your cake balls; too cool and it will be too thick and clumpy.
-
Troubleshooting Thick Melts: If your candy melts become too thick while dipping, add a tiny bit more shortening (1/2 teaspoon at a time) and stir until you reach the desired consistency. You can also return them to the microwave for a few seconds to warm them slightly.
-
Preventing Cracking: Cracking in the coating often happens if the cake balls are too cold or if the melted coating is too hot. Try letting your chilled cake balls sit at room temperature for 5-10 minutes before dipping, and ensure your candy melts aren't overheated.
-
Customization Galore: The possibilities for customization are endless!
- **Flavor Combinations:** Try lemon cake with white chocolate coating and a hint of orange extract, or chocolate cake with peppermint extract and dark chocolate coating.
- **Seasonal & Holiday Themes:** Use food coloring in your candy melts, different colored sprinkles, or themed edible decorations to match any holiday or event.
- **Texture:** Add finely chopped nuts, crushed cookies, or shredded coconut to your cake mixture for added texture.
For even more ideas on personalizing your treats, explore this guide: Easy Customizable Cake Balls: No-Fuss Recipe for Any Occasion.
-
Storage: Store your finished cake balls in an airtight container in the refrigerator for up to a week. They can also be frozen for up to a month; simply thaw in the refrigerator before serving.
These decadent cake bites are about to become your new dessert obsession! This fool-proof `cake balls recipe` combines doctored cake mix, a tub of frosting, and dreamy melted chocolate to create a sweet and buttery ball wrapped in a candy shell. Best of all, they're customizable, easy to make, and there's zero special equipment or molds necessary—no sticks, no fuss, just decorative dessert happiness in every bite.
Now that you're armed with this easy cake balls recipe and its secret gourmet twists, you're ready to create delightful, impressive treats that taste incredibly complex yet are surprisingly simple to make. Don't be afraid to experiment with different flavor combinations and decorations. Whether for a special occasion, a party, or just a sweet craving, these perfectly moist and flavorful cake balls are sure to be a hit. Happy baking!